
How To Sight In a Crossbow Scope
 Whether you’re just starting out with crossbows, or even if you’re a veteran x-bow shooter, you might find that the most perplexing parts of setting up a new scope is sighting it in. It’s important to get it done right, since this is key to your accuracy being dead-on and getting those all-important kill shots, but it can be a frustrating process if you don’t know how to do it right.
Sure, there are some scopes out there that won’t sight in properly no matter what you do. If you’ve done your research and read reviews of the scopes, though, this hardly is ever the case. Instead, it’s usually a matter of technique. Follow these guidelines carefully, as well as our guide on mounting your crossbow scope to begin with, and you’ll find yourself getting sighted in quickly and easily. Here’s how to sight in a crossbow scope:
Gather what you’ll need
First, make sure you have everything you’ll need at the range.
- Your crossbow, with the scope already mounted and aligned.
- The instruction manual that came with your scope
- Screwdrivers for adjusting the windage and elevation on your scope
- A chronograph (if needed; read this entire how-to and decide whether or not you need one)
- A crossbow rest, bipod, and/or tripod
- Arrows (at least 4)
- Targets
- Binoculars or spotting scope
Sighting in the crossbow
Follow these steps to start off the process of sighting in your crossbow.
- Set up exactly 20 yards away from your target.
- Cock your crossbow using a rope or crank aid.
- Seat an arrow on the flight rail of your crossbow.
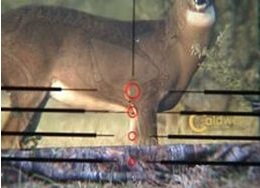
- Align the top-most red dot or reticle in your scope with the bull’s eye.
- Squeeze the trigger quickly, using just the tip of your finger. Moving your entire palm or arm will ruin your accuracy.
Next, approach your target or check it with your binoculars or spotting scope. Is the arrow on the paper? If not, you need to “boresight” your crossbow again by looking down the flight rail and aligning it with the bull’s eye. Then, adjust the elevation and windage to get you close to the bull’s eye.
Finally, for this part at least, fire three more arrows at the bull’s eye of the target.
Adjust windage and elevation
Next, you’ll adjust the windage and elevation of your scope based on how far off center your shots are.
- Approach your target, and estimate how many inches your arrow group would need to move for all the arrows to hit the bull’s eye. For example, if your shots are 1“ low and 2” left, you will need to adjust your scope up and to the right.
- Retrieve your arrows, and return to your crossbow.
- Remove the protective caps from the scope adjustment knobs and make the appropriate changes. You should follow the instructions that came with your scope, but most crossbow scopes will move the arrow point-of-impact by 1/20″ for each click at 20 yards.
Fire another salvo
Now that you’ve adjusted your scope, you can fire another round of three arrows.
- Stand at the same 20-yard distance from the target.
- Align the top-most dot or reticle on the bull’s eye.
- Following the same technique as above, fire a total of 3 arrows at the target.
Check the grouping
You should find that your arrows land much closer to the bull’s eye this time. You may find that you over-corrected a bit, or maybe didn’t correct enough (especially if you lost count of the clicks). You can make more adjustments, as necessary, and repeat the process until your scope is perfectly sighted in.
Calibrating the range compensation reticles
Many after-market scopes offer range compensation reticles, but these have to be properly calibrated or they’re worthless. In order to calibrate these markers, you program in the velocity of your crossbow with your arrows of choice, and the scope’s internals do the rest. Do not ever rely on the stated velocity of a crossbow according to the manufacturer, though, or you won’t get the same level of accuracy.
- Set up your chronograph according to the manufacturer’s instructions.
- Fire an arrow through the chronograph, and note the velocity.
- Repeat this process three more times, noting the velocity each time.
- Calculate the average velocity by adding the numbers together, and dividing by the number of shots (4, in this case).
- Dial in your scope’s velocity setting, following the instruction manual that came with your scope.
Once this is done, your range compensation reticle markers should be calibrated to accurately shoot at the ranges advertised for each marker. You can test this by shooting at various ranges. If the accuracy is off, you should recheck your sight at 20 yards and recalibrate the velocity, again using the chronograph.
Keeping your scope sighted in
A properly sighted in scope should hold zero for quite some time, at least through a single hunting season. I’ve found that my scopes often hold zero through a couple of seasons, unless the scope is damaged or subjected to a fall. Regardless, always check your scope’s zero before the beginning of each season.

Leave a Review