
How To Mount a Riflescope
 You can always have your local gun shop mount your riflescope for you, but most shops will charge money for this service if you didn’t buy the scope directly from them. Many will even charge a mounting fee if you did buy your scope from them, so it’s always a good thing to know how to do the job yourself.
A few bucks saved is money you can spend on things like ammunition. This guide will help you learn how to mount a riflescope like a pro.
What you need
Before we get started, there are a few things you’ll need up front.
- A clean, well-lit area
- A gun vise
- Your new scope
- Scope rings for your scope
- A mounting system of some sort (some rifles will already have this)
- A properly fitted screwdriver
- An Allen wrench of the appropriate size for your ring screws (if applicable)
- Loctite (optional)
Getting started
If your rifle does not already have a mounting system, you’ll need to install one. Here’s what you need to do to install your Weaver, Picatinny, or Dovetail rail.
- Remove any filler screws from the top of your receiver.
- Degrease the holes you just removed the screws from
- Degrease all mount parts.
- Reapply a light coat of oil to the top of the receiver and the bottoms of the bases or rings. Some manufacturers using Torx screws will even suggest a light coat of oil on the screw threads.
- Install the bases of your mounting system using Loctite or oil, depending on manufacturers recommendations. Make sure you are using the proper screws for the right holes, since some bases will have screws of different lengths.
Some tips on using Loctite are in order. Make sure you apply a light coating of Loctite to the screws themselves, not the threaded holes.
Install the rings
Next, you should install the bottom half of the rings onto the bases. Different types of mounting systems and scopes will have slightly varied procedures for this. Here are the most common.
Weaver or Picatinny system
You can tighten the rings securely with your properly sized screwdriver or wrench. If you have a Leupold turn-in style set of rings, follow this procedure:
- Assemble the top half of the ring onto the bottom ring
- Place it in the base
- Use a wooden dowel or non-marring screwdriver handle to turn the ring 90 degrees
If you’re using Leupold turn-in style rings, a Leupold ring wrench is an amazing invetment.
Dual dovetail system
If you have a dual dovetail system, you’ll have to repeat the procedure for the rear ring. You may see an adjustable rear base on Leupold systems with opposing screws that allow for windage adjustments, so center the ring on the base by eye and then tighten the opposing screws.
Align your rings
Properly aligned rings are essential to prevent damaging your scope tube. Use a scope ring alignment tool, if you have one. You install the alignment tool between the ring halves, moving the front and rear rings using the tool until the pointed tips of the tool are almost close enough together to touch.
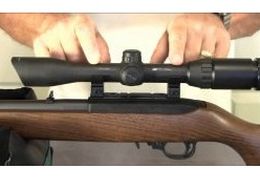
Install the scope
Next, you can remove the top halves of the rings. Place your scope in the bottom ring halves, and it should fall to the bottom of both rings if you have the rings properly aligned. If it doesn’t, repeat the above procedure to make sure your rings are properly aligned. Once everything is good, lightly install your top ring halves.
You’ll want to make sure your scope’s turrets are positioned correctly, or your reticle will be off and more difficult to use. The side windage turret should be parallel to the ground, and the top elevation turret should be perpendicular to the ground.
Boresight your scope
Before you head out to the range and properly sight in your scope, you should boresight it. If you can, remove the bolt of your rifle and look through the bore at a target placed at least 25 yards away. Then adjust your scope so the crosshairs are pointing at the same spot you see when you look through your barrel.
My personal preference for boresighting is a laser boresighter. With a laser boresighter, you’ll need a highly reflective target set about 25 yards away. You insert the boresighting tool into your rifle’s bore, and it emits a laser beam downrange. You should adjust your windage and elevation until the laser beam is on paper and centered in the reticle.
If you have to make significant changes to the windage and elevation knobs just to boresight your rifle, something is wrong. Check your scope alignment, and possibly remove the scope and realign your rings. If you’re using a dual dovetail system, you may need to switch to a base with windage screws. If elevation is the problem, you might need a shim under your front or rear base, or possibly a base with built-in elevation.
Please note this: no boresighter can sight in a gun! Boresighting simply gets your shots on paper at shorter distances, so you save ammunition by having your sights on paper at longer distances.
Lap your rings
This is optional, but once your boresight is good you can lap your rings. This polishes the inside of the rings, and help ensure maximum scope-to-ring contact while also removing sharp edges that might damage your scope. Lapping tools are available to help with this, and they always come with instructions to explain the process for that particular tool.
Once you’ve lapped your rings, make sure you remove the abrasive lapping compound with a solvent, then degrease with a moistened patch. Place your scope in the bottom half of the rings and then loosely install the top ring halves.
Adjust eye relief
This is almost the final step of mounting your scope: adjusting the eye relief to its best position.
- With your scope at its highest magnification, aim at a bare wall or at the sky
- Move the scope gently forward and backward to adjust the eye relief
- The idea is to get the scope as far away from your eye as possible and still give you a full sight picture
Make sure you are adjusting the eye relief at the highest magnification. The reason for this is that the scope will have more eye relief at the lower magnification.
Level your crosshairs
This is easily the most tedious and frustrating part of installing a scope, but if you do it right it’s a cinch. Don’t try to do this by eye, because you’ll wind up re-leveling several times and doing a ton of guesswork. Instead, get a leveling product that rests on your gun and your scope and takes the guesswork out of the procedure.
One tip to bear in mind is that tightening your ring screws will move your scope one way or the other. Tighten the top half of your ring screws evenly from one side to the other, adjusting the screws just a bit each time and trying to keep the gap between the rings even. There will be a gap, so don’t try to completely close it.
That’s all, folks!
That’s it, your scope is now mounted and ready to sight in. Check the action of your firearm to make sure it’s not bound by too-long base screws, and ensure that the ocular bell doesn’t get in the way of the bolt on a bolt-action rifle.
Boresight your scope again, and go shooting! Check the tightness of your screws occasionally


Leave a Review