
How To Mount a Crossbow Scope
 If your crossbow doesn’t come with a scope, or if you want to replace a bundled scope, you will need to know how to properly mount the scope. Sure, you could have a bow technician do it for you, but that takes all the fun out of owning a crossbow! Plus, they’ll usually charge a mounting fee that is just ridiculous. It’s better to learn how to do the job yourself, so here we go.
First, make sure you have everything you need. To properly mount your scope, you’ll need some essentials:
- A padded vise for your crossbow. Make sure the vise is as far awayy from a wall opposing the x-bow as possible. We will use the opposing wall to “boresight” your scope later
- A level
- Your crossbow
- The mounting system, if your crossbow doesn’t have one already
- Your scope
- Scope rings (usually 1″ rings) – make sure the rings fit the mounting system for your crossbow. Your choices are either Dovetail or Weaver/Picatinny, so match the rings to the rail.
- A properly fitted screwdriver
- A properly fitted Allen wrench (if applicable)
- Loctite (optional, but often recommended)
Vise your crossbow and level it
Starting from scratch, you’ll want to mount your crossbow in the padded vise and level it. This is crucial to making sure your scope is installed properly, without any cant or other problems that might affect sighting it in later.
- Place your crossbow in the padded vise. The farther away from the wall opposing the crossbow, the better.
- Lay your level on the arrow flight rail, horizontally.
- Level the crossbow in the vise and then lock it down.
Remove the iron sights
If your crossbow has iron sights, you’ll want to remove them. With your crossbow in the vise, and follow the instructions that came with your crossbow to remove them..
Install the mounting system (if needed)
For starters on crossbows that don’t already have rails, you’ll need to install the mounting system. Follow these instructions to get that job done.
- Remove any filler screws from the top of your crossbow.
- Install the bases of your mounting system using Loctite or oil, depending on manufacturers recommendations. Make sure you are using the proper screws for the right holes, since some bases will have screws of different lengths.
Sometimes, a manufacturer will say using Loctite voids the warranty. If this is the case, proceed with caution; you don’t want to void your warranty, but you may find that the scope won’t stay properly tightened otherwise. If you do apply Loctite, use a very light coating on the screws themselves. Never try applying Loctite to the threaded holes.
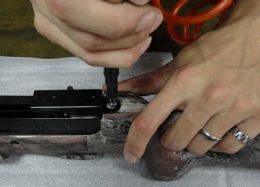
Install the scope rings
The next step is to properly install your scope’s rings. You want to make sure the rings will allow the scope to lay down in the rings without moving too much when you tighten the scope into the rings. Install the bottom half of the rings first, tightening them securely with your properly sized screwdriver or wrench.
Align your rings
Improperly aligned rings are the leading cause of scope damage, so make sure you follow this step. Using a scope alignment tool works wonders for this procedure. You just need to place the alignment tool between the ring halves, and then move the front and rear rings together using the tool until the pointed tips of the alignment tool are almost touching.
Putting in the scope
Check to make sure your crossbow is still level. Then, set the scope into the rings. It should fall to the bottom of the rings. Now, you can install the top half of your rings, and tighten them lightly.
Make sure your scope’s turrets are positioned right, or you’ll find that the reticle is off and more difficult to use. The top turret, the elevation adjustment, should be perpendicular to the ground. The windage turret on the side should be parallel to the ground.
‘Boresight’ your scope
On a rifle, this is the point where I’d boresight the scope using a laser boresighting tool. There are a few laser boresighting arrows on the market, but I’ve found a much simpler and cheaper way of ensuring crossbow scopes are on paper before heading to the range.
- Once again, check that your crossbow is still level in the vise
- On the opposing wall away from the crossbow, draw a horizontal line. Use the level to ensure the line is truly level horizontally.
- Look through your scope, and align it so that the horizontal crosswire in the scope is matched to the line you’ve drawn on the wall. Once that’s done, tighten down the scope.
Finishing up
If you’ve followed these instructions properly, your scope should be properly mounted and ready for the range. Yes, you could have had someone else do this for you, but learning how to properly maintain your crossbow is part of responsible bow ownership, and it’s fun to boot! There is also nothing like making sure you’ve gotten the job done the right way, and not half-cocked by some bored technician trying to meet a quote.
When you’ve finished mounting your scope, you should head to the range and properly sight it in. You’ll find that by “boresighting” the horizontal crosswire, a lot of the work will already be done, but you will probably still need to adjust your windage and elevation to hit bull’s eyes with every shot. Head out to the range and have fun with it!


Leave a Review